
Xero Projects gives you a simple way to track time and money against each job you run, so you can invoice accurately, see which jobs are profitable, and stop guessing where your costs went. It works well on its own. It works much better when the bills and receipts feeding into it carry the right level of detail.
That is where Datamolino fits in. Datamolino captures your supplier invoices and receipts, including the individual line items, and exports them straight to Xero. Once a bill is in Xero, each line can be assigned to a project, marked as billable, and pulled onto a customer invoice without retyping anything.
This guide walks through the full workflow, from capturing a multi-line supplier bill in Datamolino to invoicing your client from Xero Projects.
Why line-item capture matters for Xero Projects
Most projects involve costs from suppliers that cover more than one thing. A builder’s merchant invoice covers timber for one job and fittings for another. A travel bill covers flights for two consultants on two different engagements. A subcontractor invoices for three sites in one PDF.
If your capture tool only pulls the invoice header (supplier, date, total), you cannot split that bill across projects without manually re-entering the lines in Xero. You either lose the project-level detail or you do the typing yourself. Both options defeat the point of using a capture tool.
Datamolino captures the full line-item breakdown, including description, quantity, unit price, tax, and account code per line. That detail is what makes Xero Projects work properly. Once each line is in Xero as a separate row on the bill, you can assign each line to its own project, charge some lines to clients, and keep others as internal cost.
If you want a deeper look at how line-item extraction works inside Datamolino, see our Line item data extraction page.
Before you start
You will need:
- An active Xero subscription with Xero Projects enabled (Projects is a paid Xero add-on)
- A Datamolino account connected to your Xero organisation. If you have not connected yet, see the Xero integration page for setup steps
- At least one project created in Xero, with the customer linked to it
- A supplier bill or receipt to process (preferably one with multiple lines, so you can see the project assignment work)
Step 1: Export the bill from Datamolino to Xero
Process your supplier bill in Datamolino as you normally would. Once the data is reviewed and the line items are correct, export the bill to Xero. This is a standard export, no special setting is needed for Projects.
After the export, click through to the bill in Xero directly from Datamolino. This saves a few clicks and makes sure you are working on the right document.

Step 2: Open the bill in Xero and start the project assignment
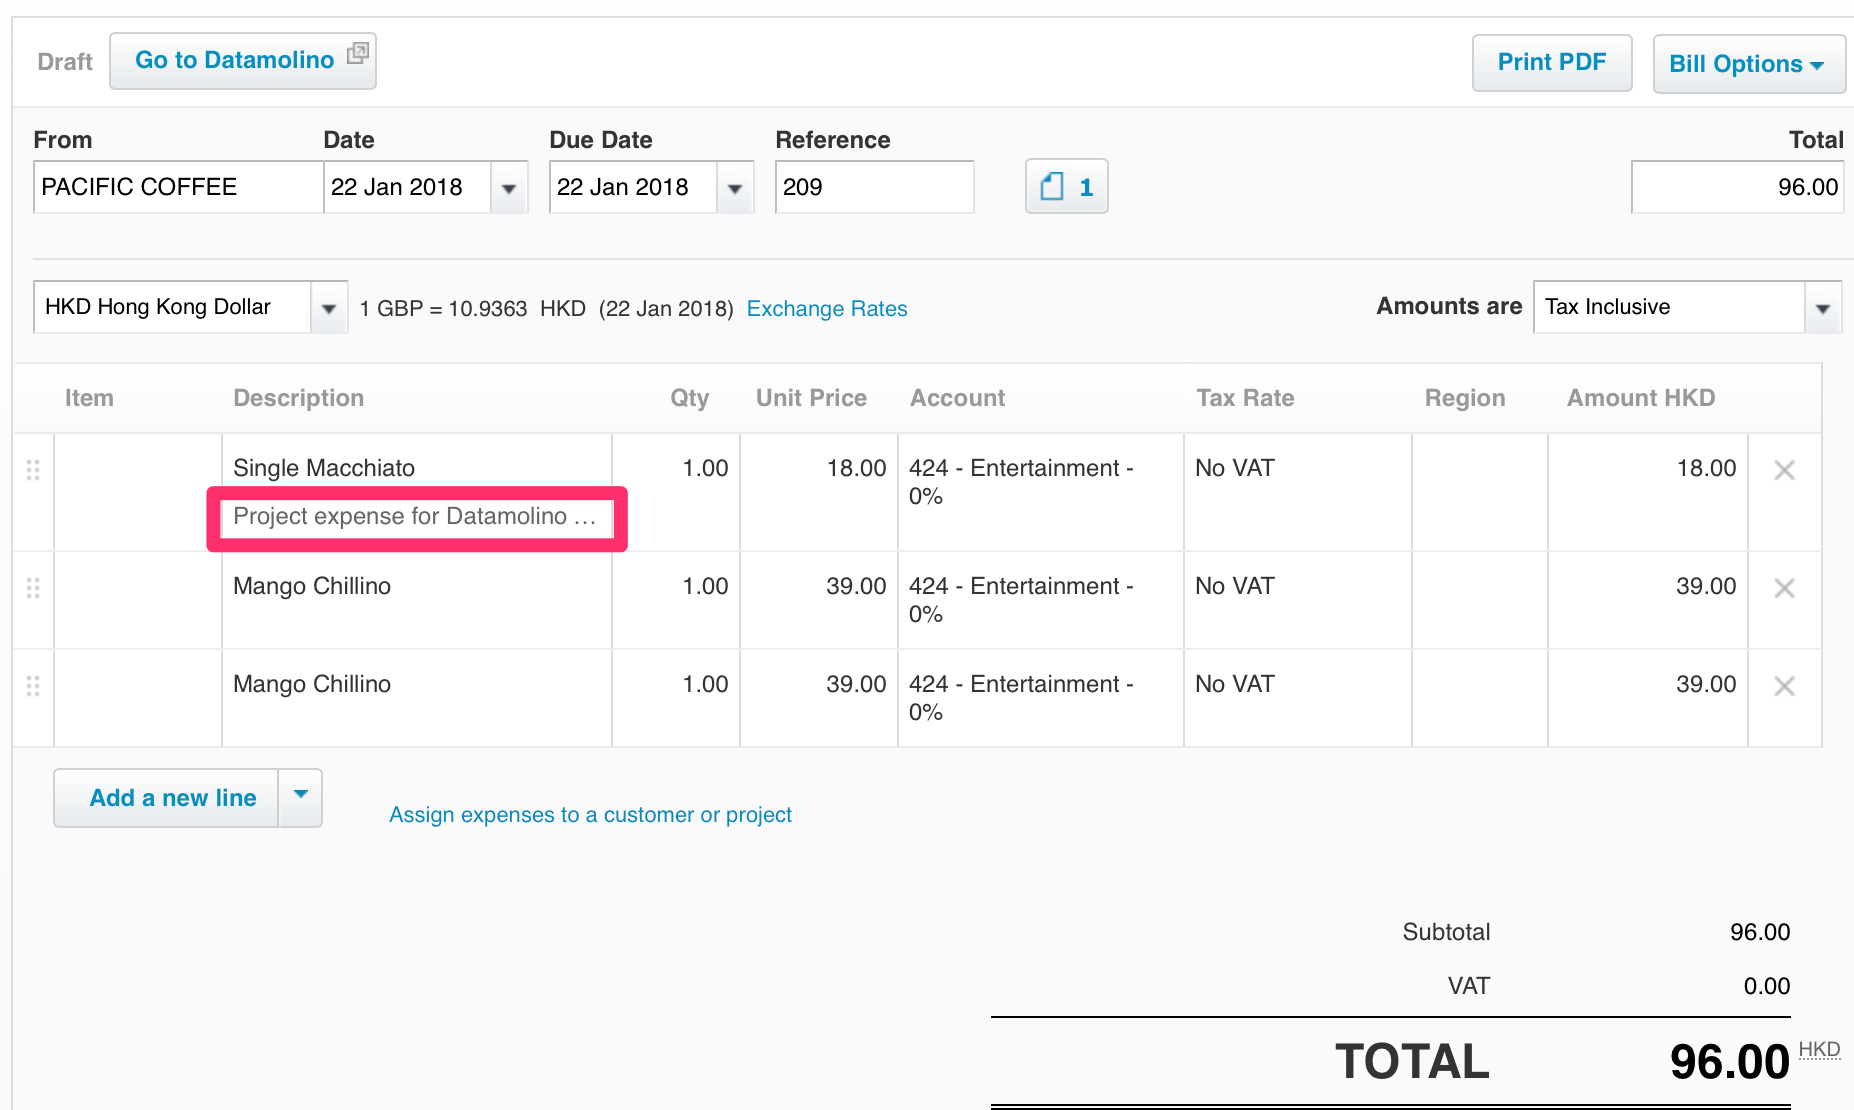
In Xero, the bill opens with all the lines Datamolino captured already filled in: supplier, date, account codes, tax codes, and each individual line item.
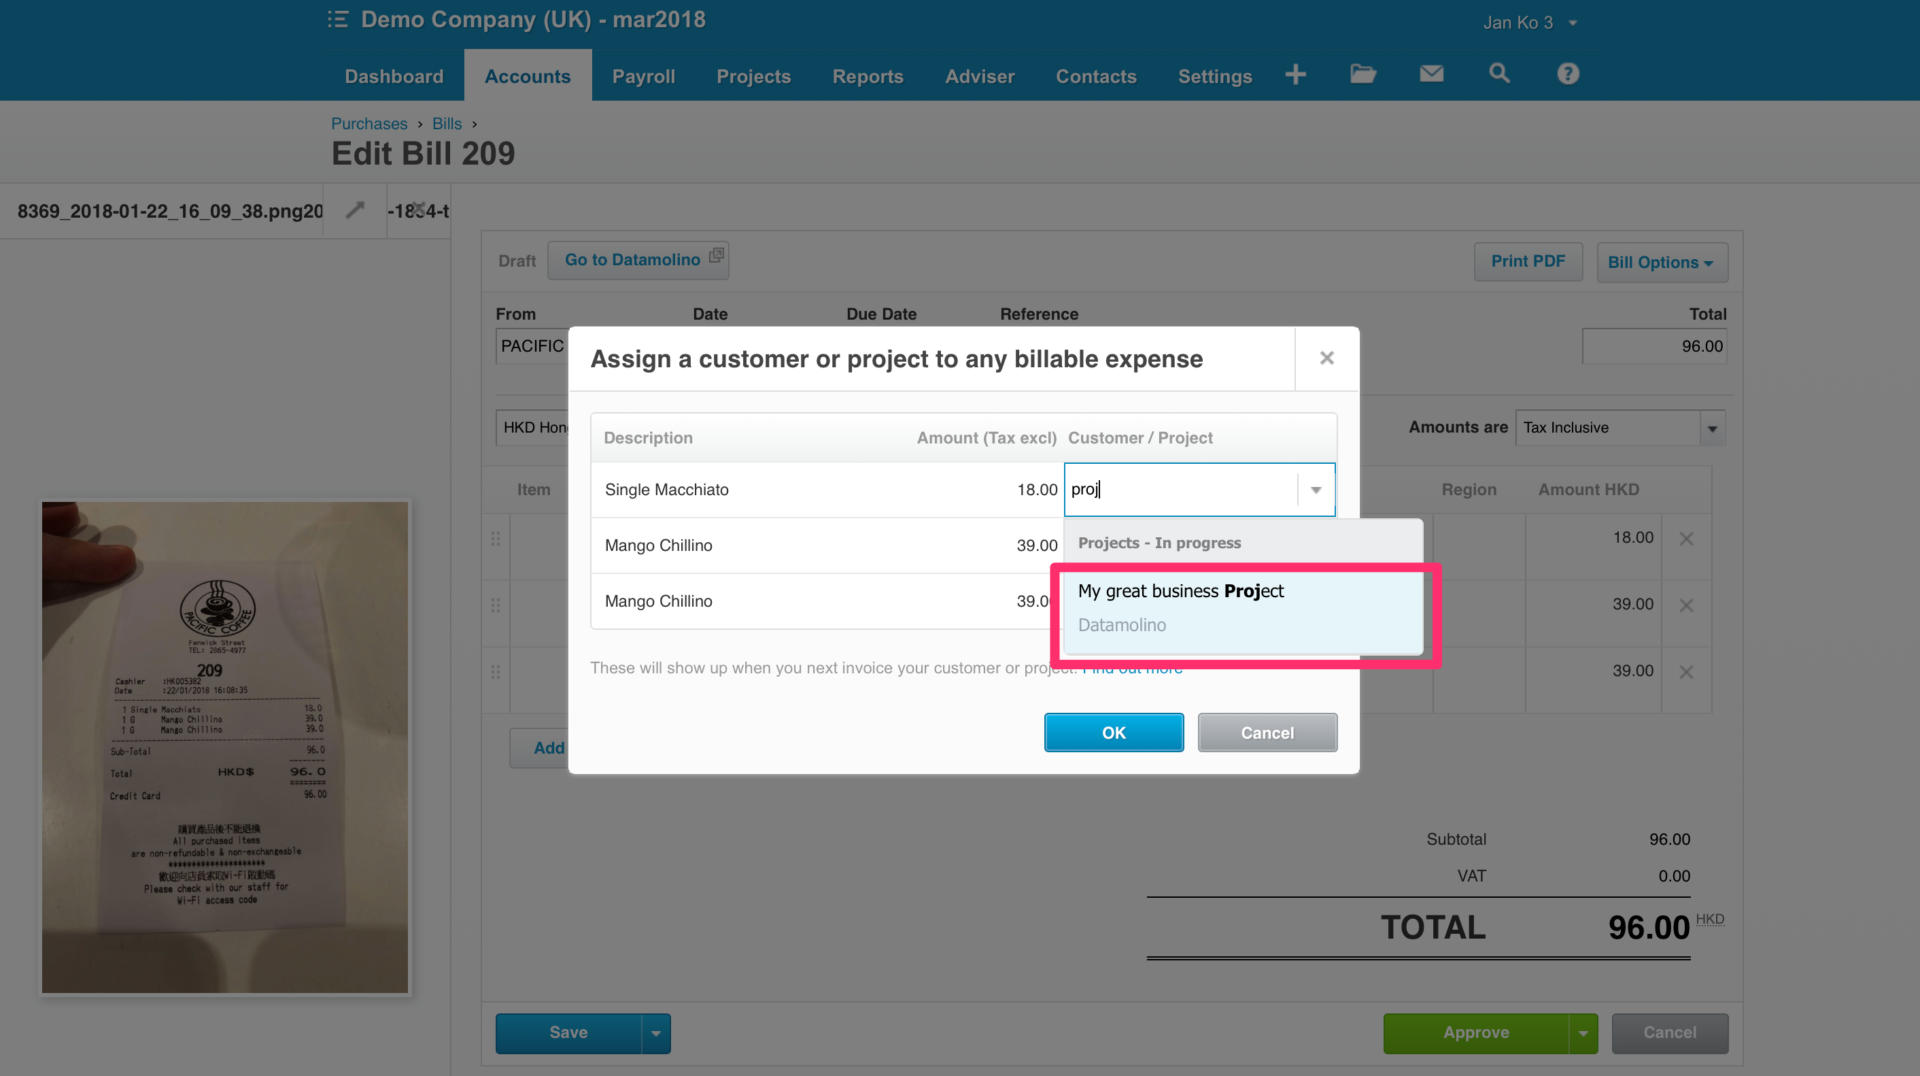
Look for the link “Assign expenses to a customer or project” on the bill. Click it to start mapping each line to a project.

Step 3: Assign each line to a project
This is where line-item capture pays off. You can now assign each line on the bill to a different project if you need to.
For example, on a builder’s merchant bill with timber, screws, and paint:
- Timber → “Smith House Renovation”
- Screws → “Smith House Renovation”
- Paint → “Jones Loft Conversion”
Each line is treated independently. You set the project, mark whether it is chargeable to the client, and Xero handles the rest.
If your capture tool had only pulled the bill header, you would be retyping each line into Xero by hand at this point. With Datamolino, the lines are already there.
Step 4: Review the assignments and approve the bill
Before saving, review the project assignments to make sure each line is going to the correct job. Check the chargeable flag too, since this controls whether the cost will appear on the customer’s invoice later.
Once you are happy, save or approve the bill in Xero as you normally would.
Step 5: See the expenses in your project dashboard
Open your project dashboard in Xero. The expenses you assigned are now showing as costs against the project, contributing to the project’s profitability calculation.

Step 6: Edit the expense and set chargeable status
If something needs adjusting after the fact, say a cost was marked chargeable when it should not have been, or you need to change the amount you will pass on to the client, you can edit the expense directly inside Projects.
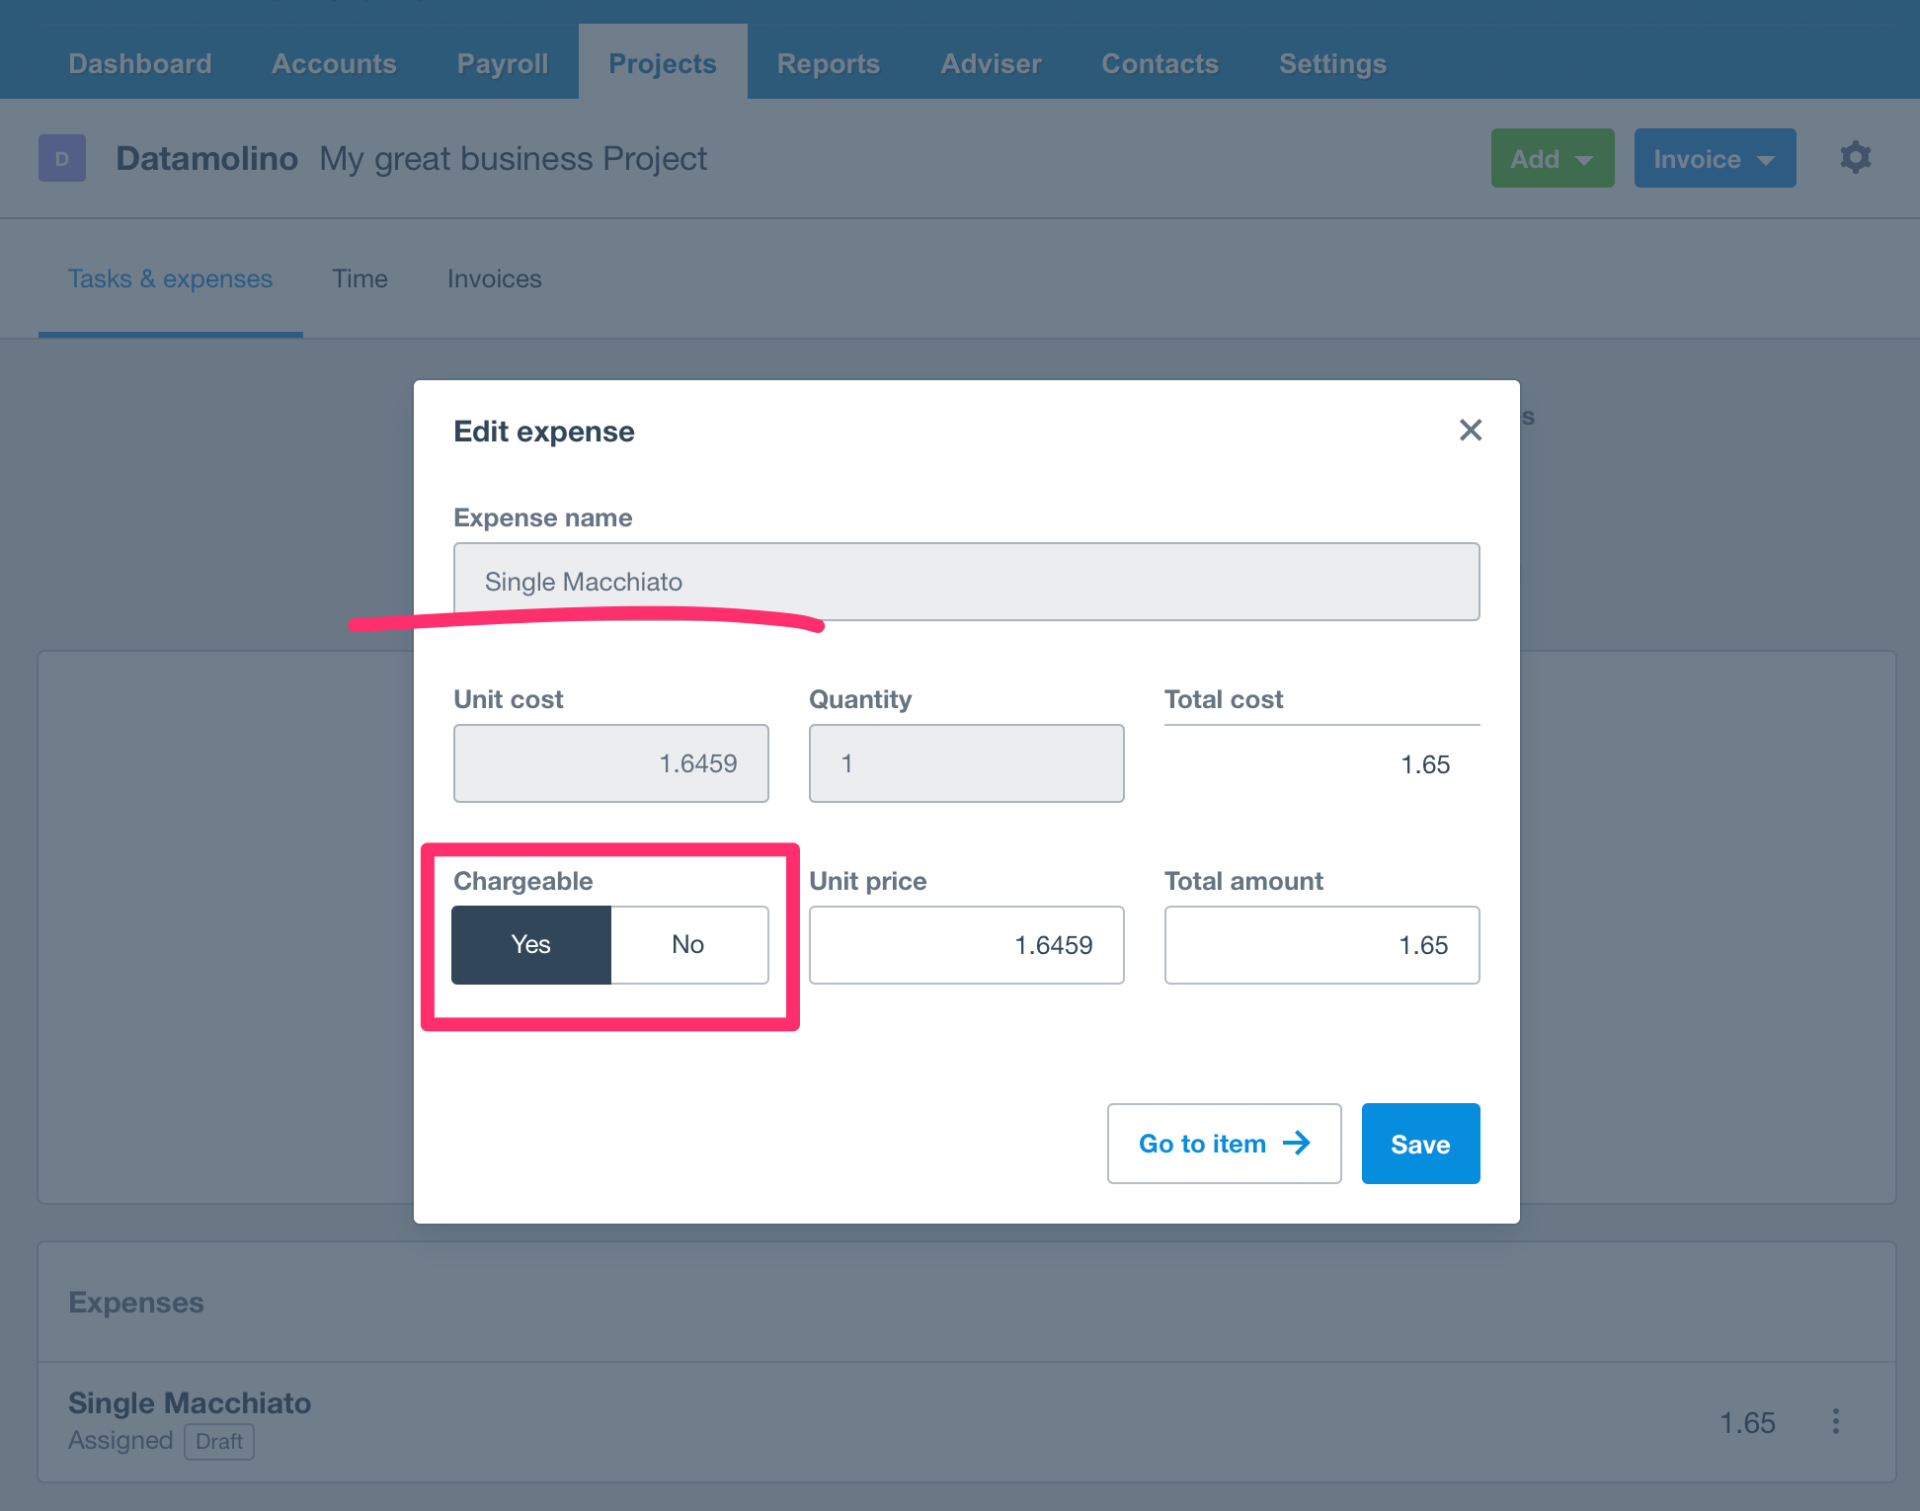
Step 7: Invoice your client from the project
When the project is ready to bill, create the customer invoice directly from the project dashboard. Choose to invoice “tasks and expenses” or the “full project amount”, and Xero pulls every chargeable expense onto the customer invoice automatically.

A practical example: passing through subcontractor costs
Here is a common pattern this workflow solves well.
You run a small construction firm. A subcontractor sends you a single bill for £4,200 covering work across three of your active jobs. Without line-item capture, you would either record one £4,200 bill against your “Cost of sales” account and lose the per-job detail, or you would split it manually in Xero by retyping each line.
With Datamolino plus Xero Projects:
- The full bill is captured in Datamolino, with each of the three jobs as a separate line
- Export to Xero, one click
- Open the bill, assign each line to its job, mark chargeable where the client agreed to pass-through pricing
- Each project dashboard now shows its share of the subcontractor cost
- When you invoice each client, the chargeable subcontractor lines appear on their invoice with the original description
Total typing involved on your side: zero, beyond clicking the project name three times.
Try Datamolino free, process 100 documents at no cost.
Frequently asked questions
Can Datamolino assign expenses to Xero Projects automatically during export?
No. Datamolino exports the bill with full line-item detail to Xero, and the project assignment is done inside Xero on the bill itself. This is by design. Project assignment usually depends on context that lives in Xero (which projects are open, which customer is linked) rather than on the supplier document. Once the lines are in Xero, assigning them takes seconds.
Does Datamolino capture line items for project expense tracking?
Yes. Datamolino extracts each line from the supplier invoice (description, quantity, unit price, tax, and account code) and exports them as separate lines on the Xero bill. This is what makes per-line project assignment possible. See our Line item data extraction page for more.
Can I invoice clients from Xero Projects using data captured by Datamolino?
Yes. Once a bill from Datamolino is in Xero and its lines are assigned to a project as chargeable, you can invoice the client directly from the project. Xero pulls those chargeable lines onto the customer invoice with their original descriptions and amounts, no retyping.
Do I need a special Datamolino plan to use Xero Projects?
No. Any Datamolino account connected to Xero exports line-item data by default. The only requirement on the Xero side is that Xero Projects is enabled on your subscription, which is a separate paid add-on from Xero.
What happens if a bill covers a mix of project and non-project costs?
You assign only the relevant lines to a project. The other lines stay on the bill as normal expenses. There is no requirement that every line on a bill belong to a project.
Does this work the same way in Xero AU, UK, US, and other regions?
Yes. Xero Projects works the same way across regions, and Datamolino’s export to Xero is region-agnostic. Tax codes are handled by Xero in line with your country’s setup.